Thursday, August 25, 2011

Catherine’s recipe – Okra in tomato sauce

Okras are in season. The vegetable stall where I regularly buy from has been selling what is also called “lady’s fingers” for the past few weeks. As I am not familiar with okras I asked my sister to send me a recipe. I remember when I visited her in California she talked about delicious okra dishes she had at her mother-in-law’s home and knew she would have a good recipe.
Okras become slimy and break easily when cooked. She advised me do not stir them too much otherwise she said they would mash easily. It is better (for our eyes and also our palate) to keep the pentagon-shaped slices intact in the stew. Okras are filled with lots of small white seeds.


Catherine advised me to draw out the liquid from the pods before cooking them. Two hours before cooking I put the okra (cut in rounds) in a colander and sprinkled the pieces with 2 tbsp of coarse salt. Just before cooking I drained the soaking liquid from the okras; (do not rinse the pods).

Here is my sister’s recipe with one modification: the addition of minced pork to give the dish a hearty flavour.

Ingredients:
v     2 tbsp olive oil
v     About 200g minced pork
v     1 onion (chopped)
v     2-3 small red chilli (chopped)
v       800g (2 can) tomatoes
v       1 tsp turmeric
v     300g okra (tops cut and sliced).
v      Salt & ground black pepper
v     2 tbsp parsley (chopped)

Steps:
  1. 2 hours before cooking draw out the liquid from the okras (as explained above).
  2. In a saucepan cook the minced pork until brown. Add onion and cook until translucent.
  3. Add chilli to the onions and cook for 1 minute.
  4. Increase heat and add tomatoes, mix well. Add okra, turmeric, salt and black pepper.
  5. Bring vegetable stew to a boil. Reduce heat, cover the pan and simmer until vegetables are tender and the sauce has thickened. (about 35-45  minutes)
  6. Transfer to a serving dish.
  7. Add parsley.
  8. Serve at once.
I was the only one having dinner at home on that night and the dish was too big so I put the surplus in the fridge. I ate the leftover 2 days later and it was even yummier. As I like to repeat: “stews often taste even better reheated then when first cooked”.


Wednesday, August 17, 2011

Summer Veggies & Ratatouille

During my week-long stay at my parents’ place (in France) we did not have to buy vegetables. My parents have a vegetable garden and there was an abundance of tomatoes, green beans, eggplants and zucchini.

Like most French people in July we started our lunch with the traditional tomato salad. Either topped with olive oil, crushed garlic and chopped basil, or mixed with white onion & green bean and Italian dressing. I never got tired of eating these refreshing appetizers made with our home-grown veggies.

Veggies picked from the garden

Tomato with garlic and basil salad

Preparation of tomato salad with white onion and green beans

Cooked green beans (in colander)
As a main dish we had zucchini almost every day. We had them stuffed (courgettes farcies), baked, stir-fried, and also in stew. Without forgetting the most popular dish made with courgette which is (I think) the ratatouille. (See below my recipe). Although I make it here in Hong Kong it never tastes the same as my Mum’s. Must be the quality of the veggies, or is it the family atmosphere, the French environment, or the fact that I am on holiday and have more time to enjoy food? Maybe each one of these reasons makes the ratatouille in France taste better.

My ratatouille (in Hong Kong)


My Mum knows that I love soups even in summer and one evening she made a zucchini potage that I have never had before (recipe recently given by one of her girlfriends). On that evening I looked at my Mum making the quick and creamy soup. Here is how she proceeded:
She cut a large courgette freshly picked from her vegetable garden in large chunks, placed the pieces in salted boiling water and cooked them until tender. Afterwards she added 4 cream cheese wedges (Vache Qui Rit – The Laughing Cow) and blended the mixture until it became smooth and creamy. Et voilà! I really enjoyed her soup.  

Big chunks of zucchini

...in boiling water

My Mum blending the mixture (zucchini & VQR)

Et voilà!

This time I did not have the chance to enjoy one of my paternal grand-mother’s dishes: zucchini alla scapece. My grand-mother was born in France from Italian parents and used to make it in summer. This is a Neapolitan specialty. Scapece means pickling. This recipe (which has been adapted to suit her cooking) is made with deep-fried sliced courgettes, red-wine vinegar, onion, garlic and sage.
This dish is best prepared one day in advance and served at room temperature. It is an excellent summer entrée.  If the oil temperature is right the veggies should not absorb too much oil and the salad will not be greasy. Furthermore it is said that vinegar breaks down fat so we should not feel guilty (or unhealthy) for eating more of it. But let me tell you a secret: “This dish is delicious and most often I have to restrain myself from taking a second helping”. Why not having another portion? Because this is only the starter and more dishes are coming! Ah, and sorry I don’t have any picture to show you here as my Mum did not have time to make it for me this time… and I never tried to make it myself in Hong Kong (not yet!).


Ratatouille   

Ratatouille is very popular especially in the south of France. It is made during the summer when it is the zucchini’s season. Ratatouille is often served hot as main dish or an accompaniment to meats. It can also be eaten as an appetizer. Simply put a dollop of chilled ratatouille on a slice of toasted bread (as you know I love bread!), cracker or bruschetta.

Ratatouille on my home-made bread


Ratatouille on bruschetta

Ingredients:
  • 60 ml olive oil
  • 4 cloves of garlic, minced
  • 1 onion, diced
  • 2 courgettes/zucchini/jade melon, cut into pieces
  • 2 eggplants, sliced
  • 400 g (1 can) chopped tomatoes (or fresh ripe tomatoes)
  • 1 sprig of thyme
  • 1 bay leaf
  • Fresh basil leaves, thinly chopped
  • Salt and ground black pepper

Steps:
1.      Heat about 20 ml of olive oil in a large skillet
2.      Add the garlic, onion and a pinch of salt. Cook over a low heat until the onion is transparent.
3.      Add the courgettes and cook until it is slightly softened. Discard the vegetables.
4.      Heat about 40 ml of olive oil in the skillet.
5.      Add the eggplants and cook, stirring often, for about 5 minutes.
6.      Return the vegetables (onion, garlic, and courgettes) to the skillet and stir.
7.      Add in the tomatoes, thyme and bay leaf. Lower the heat and cook, stirring often, until the vegetables are tender, or about 40-45 minutes.
8.      Add salt and pepper to taste. 
9.      Allow to cool and reheat for 15 minutes just before serving. Remove bay leaf and thyme.
10. Garnish with basil leaves on top of dish.


Ratatouille (mine!)

Don’t let the appearance of the dish fool you. The flavour won’t disappoint you!  Stews often taste even better reheated then when first cooked.

Bon appétit!
      

Tuesday, August 16, 2011

Soy Milk & Sticky Rolls

2 weeks ago I went to Taipei to accompany my husband for a conference.  It was my first time in Taiwan. We only stayed there for 2 ½ days.

Taiwan is often mentioned for its delicacies, street foods and also its well-known pastry fuhng-lèih-sôu鳳梨酥 (a shortbread cake with pineapple filling). I had heard that I could find these cakes at almost every grocery store but the best ones were at Chia Te. Later I was told that those from Sunnyhills were tastier. By the end of my stay I had tried both and I found the stuffing of Sunnyhills’ lighter and fluffier.

I knew that we would not have much time on our own but just out of curiosity and in case we could go and eat by ourselves I wanted to have good addresses. Although I remember visiting blogs and reading posts on Taiwan I could not recall which ones. What about sending a tweet? As you might know I am a new Tweeter user (since mid-April of this year). This would be faster and more efficient than using my poor memory. “Going to Taipei. Any recommendations?”
I was quite sure that I would get a reply as I know that the food community is very responsive, helpful {and fun J }.
I would like to thank Nancie McDermott, Janice Leung and Robyn Eckhart, who kindly and quickly provided me with links and blogs’ addresses.

After reading the recommended posts I was convinced that we had to try the soy milk breakfast. So the following day of our stay in Taipei, first thing in the morning we went to Wíhng-wòh Dauh-jèung Daaih-wòhng  永和豆浆大王  (Wing Wo’s king of soy milk).


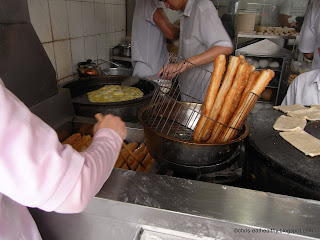
People were lining up to buy baked bread sîu-béng, deep-fried bread stick yàuh-ja-gwái, sticky rice chì-faahn, soy milk (sweet drink), salty soy milk soup, and egg pancakes.  

Preparation of baked bread

Preparation of deep-fried bread stick


Soy milk glass sealer machine


I had a hot sweet soy milk and a few spoons of the salty soy milk soup (the first time in my life). Although very special, I like it!
Together with my drink I ate a sîu-béng with a yàuh-ja-gwái stuffed inside (in a sandwich). The sîu-béng was thin and crunchy and the yàuh-ja-gwái not oily at all. A well-balanced and very yummy combo! I also had a bite of sticky rice roll. Those rolls are filled with yàuh-ja-gwái, pickled vegetables, meat floss - yuhk-sûng and condiments. It was excellent but I could not eat anymore.

Sticky rice
Baked bread with deep-fried bread stick
There are a few variants of sîu-béng fillings: scrambled eggs, deep-fried bread stick, or both scrambled eggs and deep-fried bread stick.
  

Sticky rice and salty soy milk soup

Salty soy milk soup
The soup is made of fermented soy milk (curd made with rice vinegar), pickled vegetable, deep-fried bread stick, condiments with a drop of chilli oil on top. The soup’s appearance and bumpy texture are unique as well as its taste. I liked it!

Sweet soy milk (in glass) and salty soy milk soup (in bowl)

These foods were divinely good. It would be nice to have a good restaurant in Hong Kong serving the same quality of food we had at Wíhng-wòh Dauh-jèung Daaih-wòhng. If you ever hear of one let me know!
In the meantime I have to wait for another trip to Taiwan (hope that next time I will have more time) or Shanghai which is also famous for this type of breakfast.  And I can make sticky rice at home!  Here is Arlene's recipe:

Pork and mushrooms sticky rolls  - Make 6 rolls. Need cling wrap.

Ingredients: 
  • 5 cups (5x180g) glutinous rice
  • 5 cups of water
Steps:
  1. Rinse a few times the rice and drain.
  2. Put rice with water in bowl of rice cooker on a pan.
  3. Add water and cook.
  4. When rice is cooked, let it stand for about 20mn (standby mode).
When the rice is being cooked prepare the filling as follows:

Ingredients for filling:
  • 300gr minced pork (to tenderize: marinate pork with 1 tbsp potato starch + 1 tsp salt + 1tbsp water for at least ½ hour)
  • 6 Chinese mushrooms (rinsed and soaked in a bowl filled with hot water - put the lid on - for at least ½ hour)
  • A handful of raw carrot or kohlrabi (turnip) cut in julienne
  • 2 garlic cloves (thinly chopped)
  • 2 tbsp vegetable oil

Steps:
  1. In a frying pan heat vegetable oil.
  2. Add garlic and stir-fry for 1min. Remove from pan.
  3. Add carrot (or kohlrabi) in pan. Stir-fry for about 2min.
  4. Add pork and mushrooms and cook together (continue stirring all the time) for about 5min.
  5. Transfer the garlic in the mixture and stir. Remove from heat.
  6. Unroll cling wrap on a flat surface. Put a layer of glutinous rice on top (leave 5 cm on each side).  
  7. Spread 1 layer of the cooked meat mixture on top of rice.
  8. Roll the film from the edge nearest to you up and over enclosing the filling.
  9. Close the roll by pressing thumbs and middle fingers on the sides and on the top edges.
  10. Cut the cling wrap sheet and repeat to make 5 more rolls.


Just need to learn how to make soy milk (I tried once a long time ago...need to try again).

Note: Arlene told me that in her country - the Philippines - they don't use cling wrap but a banana leaf to wrap the rice in. It gives the roll a special flavour. It must definitely be better than plastic!

Thursday, August 11, 2011

Kankana’s Stuffed Mouse Gourds

On July 12, after posting my mouse melon stir-fry recipe and sending the link to my Twitter followers I received a DM from Kankana www.sunshineandsmile.com. She asked for my email address so she could share with me her recipe. In her message she told me that mouse melon was one of her favourite veggies but could not get it in California. She said: “When I saw it {mouse melon} in your blog I couldn't help asking you to try this recipe”.   

Tonight I prepared the stuffed mouse gourds thinking of Kankana. The verdict: Delicious! And I will for sure make some again soon (when the gourds are in season). It’s a nice change from my stir-fry recipes. The melon itself is quite bland but the addition of cumin and chilli brings stronger flavours. The mashed potato combined with the turmeric-flavoured batter make a very tasty dish.

My gourds really looked like little mice (nice) patties.


Below is the adapted version of Kankana’s recipe:

Ingredients:   
  • 4 small mouse gourds/melons  
  • 1 large potato
  • 1 tsp cumin powder
  • 1 tsp chilli powder
  • Salt & black pepper to taste
  • 2 tbsp vegetable oil

For the batter:
  • 3 tbsp flour
  • 1 egg
  • Baking powder (1 pinch)
  • Salt & black pepper to taste
  • 1 tsp turmeric powder 

Steps:
  1. Blanch the veggie (leave the skin).
  2. Cut in half lengthwise and scoop out the seeds carefully. Keep the shell (outer veggie)
  3. Boil the potato and mash it with the scooped seeds. Add spices (cumin powder, chilly powder, salt & black pepper).
  4. Put above mixture in the shells.
  5. In a mixing bowl prepare batter: mix flour, egg, baking power, salt & black pepper and little bit of turmeric powder (optional). The batter shouldn't be too runny just enough “to coat a spoon”.
  6. Cover the shell entirely with this batter.
  7. Shallow-fry in vegetable oil.

Kankana uses the deep-frying method. For a while I thought of steaming the stuffed gourds but wondered if it would be tasty enough (although less fatty). I finally opted for the shallow-fry method.


For those living in Hong Kong or who can buy mouse melon if you ever try this recipe let us (Kankana and I) know how you like it.
Last but not least a big thank you to Kankana. :)

Tuesday, August 9, 2011

Oxtail in Mexican Mole Sauce

After reading Eda’s recipe called Ancho Pancetta Oxtail Mole (see locavore-project-part-2 ) on her website (www.edamame-eats.com) I could not resist but try to make it. I love ox tail and the addition of chocolate in a savoury dish attracted me.
So, last Saturday I went to the supermarket to get all the required ingredients and in the afternoon prepared my version of Eda’s Ancho Pancetta Oxtail Mole.
I was so pleased with the result that I thanked Eda for sharing her great recipe and asked her if she would not mind if I posted a variation of her dish on my blog. As she kindly accepted I am glad to share it with you today.
Believe me it is worth trying and most of all eating it!!!

Ingredients:
  • 80g smoked pancetta
  • 2 small carrots (diced)
  • 1 large celery stalk (diced)
  • ½ orange onion (diced)
  • 3 small red chile (chopped, with seeds)
  • 55cl red wine
  • 125ml broth (125ml water mixed with ½ cube of organic vegetable stock). I did not use beef stock as I did not have time to make my own)
  • 600g oxtails (separated joints)
  • Salt & ground black pepper
  • ½ can of tomatoes
  • 1 tbsp tomato purée
  • ½ tsp cumin
  • ½ tsp oregano  
  • 12g dark chocolate (no added sugar) 
  • Parsley to garnish

Steps:
  1. In a saucepan I browned the pancetta then added celery, carrot, onion and chile, and continued browning everything for about 10 minutes.
  2. I added the red wine and turned up the heat to let the wine reduce. Then, I transferred the mixture in a bowl.
  3. After sprinkling salt and black pepper on ox tail I added 2 tbsp olive oil in same saucepan and browned the ox tail. Them I transferred the ox tail to the bowl with veggie/pancetta mixture.
  4. I lowered the heat and in the same saucepan I added the tomatoes, oregano, cumin and chocolate. I stirred well all the ingredients and added the tomato purée. 
  5. Afterwards I transferred the ox tail and the veggie/pancetta mixture into the saucepan and covered everything with the vegetable broth.
  6. I cooked the ox tail on low heat for 2 hours (with heat diffuser plate under flame) mixing occasionally.
Below is the photo of the finished dish served with penne rigate. I am afraid that my picture doesn’t give enough credits to the flavour of this delicacy.


The ox tail meat was well cooked and flaked off the bones. The chocolate/chilli-flavoured sauce has a spicy flavour with a sweet aftertaste. So yummy! My husband and I cleaned our plates!

In some aspects (its rich flavour, consistency and wine taste) the Mexican mole sauce reminded me of the rabbit stew’s red wine sauce (civet de lapin) I had when I was small. I recall that my Mum usually serves rabbit stew with a creamy polenta. Next time I make this dish I will also prepare a savoury (or sweet) polenta cake or maybe some potato gnocchi to go with it (is my Italian blood showing? ;)


Notes:
- Mole is the name for many Mexican sauces. They are usually made with one or several types of chiles, spices and chocolate
- Ancho chile is another name for poblano pepper.

Friday, August 5, 2011

French outdoor market


It has been a long time since my last post. It is not that I did not have anything to share but I have been away for almost 3 weeks and did not find time to write.  I know that I don’t have any pressure (my blog having no commercial purpose) but recognize that I have been neglecting my followers and ask them (you) to accept my apologies.

I spent a few days in London, almost a week in France (to visit my parents) and finally a long week-end in Taiwan. A lot to discover, to visit and of course to eat!

During my stay in France I went to the wet market. Going to the Saturday market has become a pilgrimage. Each time I return to my hometown I have to “faire le marché” – shop at the market. This weekly market is held in the city centre, and each Saturday from 6:00am to 1:00pm the heart of the town turns into a pedestrian mall. Not only do I go there to buy food but also to take pictures and chat with my old friends. Vienne is a small town but its Saturday market attracts lots of people from the surrounding villages. This is the place where you are bound to meet friends and distant relatives and hear folks exchanging news and gossiping. 

I particularly like the stalls selling vegetables and fruit as well as the rotisserie (with its spit-roasted chicken) and the olives vendor.


Vegetables / Fruit:  An array of colours!


At this time of the year musk melon (cantaloupe, from Spain and France), apricots, peaches and nectarines are everywhere.


Yellow and green courgettes (Italian squash/zucchini), cucumbers, tomatoes, and bell pepper are also in abundant supply.


Artichokes (I love artichoke!)


Rotisserie: Roasted chicken (poulet rôti)!

During a normal summer day the sun is scorching hot and I don’t envy the stallholders facing the grills! On the other hand in the winter they are the luckiest and their customers are happy to queue up so they can warm up before continuing with their shopping.  No matter the season there are always people waiting to be served. On the day I was there the weather was pretty cool for a summer day and the scent of roasting chicken kept attracting folks to their stall.


Just by looking at these juicy chicken I can still smell their aromatic herbs aroma.


For a few extra € you can get grilled potatoes with chicken gravy.

Next to the rotisserie chicken stall is the olives vendor.


Oil / Olives / Tapenade / Anchoïade / Pissaladière:

Like most of the booth holders the owners of this stall have been selling their goods each Saturday for the past 30 years. At their place you can find excellent cured and marinated olives as well as other Mediterranean food products such as tapenade (spread made with olive, garlic, capers and anchovies), dried tomatoes, preserved lemons (for tajines and other Moroccan dishes), lupin beans in brine, anchoïades (anchovy purée/spread), anchovies marinated in oil, garlic and parsley, olive oil and pissaladière (onion tart with olives, anchovies and herbs).


Olives are presented in large baskets covered with plastic wraps and come from Italy (Sicilian style), Spain (Andalusia - Seville), Greece (Greek-style) and France (Escabèche [marinated with olive oil, vinegar and smoked paprika], Niçoises [very small black olives from Nice], etc.).

I enjoy tasting olives before choosing a variety.  During the past few years my favourite type of olive has remained the Greek style. They are really delicious!                                   


A few streets away from the city centre and far away from the hubbub of the market activities I find calmness walking through the small alleys on my way home with a basket full of fresh produces.