Showing posts with label bread. Show all posts

Tuesday, September 10, 2013

No-knead Bread

My family and friends know that I regularly bake an easy to make bread that I enjoy each morning with my coffee.
I recently met people interested in my bread and asked about my recipe. I suddenly realized that although I had mentioned it on this blog I never posted the recipe. So, here it is:
 

Monday, June 17, 2013

Making Rolls With Fresh Yeast


(As you might already know) I like to eat toasts in the morning particularly with my own bread. I usually use the recipe and method of Mark Pittman that I saw on YouTube which calls for dried instant yeast.
 

Thursday, March 14, 2013

Bread making training at iBakery

I was fortunate to have been invited by ibakery (a Social Enterprise of Tung Wah Group of Hospitals - 東華三院) to attend a professional bread making training given by Master Wang, a famous Taiwanese artisan baker.
For the past 2 years I have been making my own rustic-style bread, using Mark Bittman’s no-knead bread recipe. As the name indicates kneading is not required and it is easy to make. Recently I have tried to make a “Yes-Knead” bread with my own sourdough starter (I don't have a bread making machine) and, as of today, my trials have not yet been successful. Therefore I was more than happy to be able to attend this training and gladly accepted the invitation.
But here is more about the bread making training.


Thursday, July 26, 2012

Summer Holiday & Chocolate Bar on Bread

Saturday afternoon I was thinking of the holiday I spent in a farm when I was small. I remember this vacation very well and most particularly how I first made my own tartine au chocolat.
Why not making one right now? I cut one slice of my homemade no-knead bread (I follow Paola’s recipe and add quinoa and flax seeds. @ paosinis - cannot find her blog "thekitchennomads" today...strange}, cut it in half, put a bar of dark chocolate on top of each part and toasted it in my small oven (no patience to wait for the chocolate to melt naturally). Nice & sweet souvenirs!


Tuesday, October 18, 2011

My 1st Sourdough Starter

It is going to be a long post as I want to record the whole process of making a sourdough starter – my 1st sourdough starter.

Feel free to jump directly to Day 9 where after having completed the process I am finally making the starter that will live in my fridge for the next 100 years (but still don’t know if it will work) or just go the next post where you can see how my 1st sourdough loaves looked like.

A few months ago I started to be interested in making my own sourdough starter. It began after reading Grégoire Michaud "the sourdough supremacy" in which he wrote: “all started with water and raisins”. I was intrigued.
Then I read other bloggers’ recipes of sourdough starter and compared 2 recipes both using pineapple juice. The first one, published by NY Times was adapted from “Artisan Breads Every Day”  by Peter Reinhart.
The second was from Pinch My Salt (another adaptation of Peter Reinhart’s).

Last week I finally decided to try to make a sourdough starter with pineapple juice and flour as per Pinch my Salt’s instructions (they seem to me easy to follow). Here is how I proceeded: 

Day 1:  
In a mixing bowl I put 1 cup of whole meal flour with ¾ cup of unsweetened pineapple juice (at room temperature) and stirred it until the flour had absorbed the juice.

whole meal flour mixed with pineapple juice


Then I transferred the dough into a glass jar, covered it with a paper towel and attached a ribbon (I could not find any rubber band!) around the jar to mark the level (so I could check the progress of the sourdough as it was rising).
As per the instructions I let it aside for 24 hours at room temperature (the kitchen temperature was ~26 Cº).

mixture in a glass jar (let to sit at room temperature)
Day 2: To my disappointment there was no visible sign of change. No growth at all! Therefore I did not take any picture. But I continued to follow the procedure as instructed for Day 2.
I transferred the dough into a mixing bowl, added ½ cup of juice + 1 cup of unbleached bread flour and stir well all ingredients together. Then I transferred the dough back into the glass jar, covered it and let it sit for another 24 hours.

Day 2: after adding more pineapple juice and flour

Day 3: The dough had risen by 2-3cms. Hurray! Its consistency was thick and rubbery and filled with air bubbles.  It had a slight pineapple smell.


dough has risen!

Sticky texture - lightly scented

As per the instructions I discarded ½ of the dough and fed the remaining with 1 cup of bread flour + ½ cup water (tap water at room temperature ~ 26 C°) and then let it sit at room temperature for another 24 hours.

mixing dough with water and flour

pink ribbon marking the level

Day 4: The instructions said: “The mixture should have doubled in size. Repeat Day 3 procedure. Otherwise let it sit for another 12 to 24 hours.”
The mixture not having grown much (a mere 1.5 cm) I let it sit for another 24hours. 
Day 5: Normally, we should start to feed it twice daily.
The starter had only risen by 2cms (it should have doubled in size!). However I decided to repeat day 3’s step.
Day 6: When I woke up I was disappointed (again). The dough had not changed. I waited until late afternoon to repeat day 3’s step.
Day 7: Although not much growth, I fed it twice daily, morning and evening. According to the recipe the starter is ready to use (bake with) only if it has been active (= always doubled in size between feedings).  I was starting to be impatient. I checked other recipes on Internet and found John D. Lee's. Surprisingly his starter does not need to be fed twice daily. 
Day 8: I fed it in the morning and late afternoon and as there was not much growth I decided to pretend that my starter was ready and proceeded with John D. Lee’s Day 4’s step.  I took 1 cup of the dough and mixed it with 3 ½ cups of bread flour + 2 cups water and covered it with a plastic film.
before final step (John D. Lee's day 4)
I let it sit at room temperature overnight and the following morning put it in the fridge. I left it until mid-afternoon (almost 24hours).

Day 9: Here is how my pre-starter looked like before reserving part of it to make the starter that I am supposed to be able to keep for 100 years!

pre-starter

1 used 1 cup to make my starter (a)
I reserved 1 cup of the pre-starter as it was. I will call it starter (b)  

Starter (a): I used 1 cup of the above dough and fed it with 2 cups of bread flour and 2 cups of water.  I stored the starter in the fridge (in a closed glass jar). [Note: I put more flour and water than what I should have as I thought the dough was too stiff].

starter (a)

starter (b)

Feeding: Take away ½ of the starter and mix the remaining ½ with equal amount of flour and water.  

Some bakers recommend a 3/2 ratio. Others feed the starter every 3 days, others once a week [some even have no problem with feeding it once every 8 weeks]. Some advise to feed it 2-3 days (each day) before using it, as well as after every time you use it.
Some bakers recommend stirring the starter 2-3 times a day.

After further reading I know that it is best to use tap water that has been set out for 24 hours (I did not wait that long). An inappropriate amount (ratio) of starter, flour and water is also important to get an active starter, as well as a cool (~ 20ºC) temperature (my kitchen was ~26-28ºC).

It takes time to take care of a sourdough starter although it is not complicated.  With time and practice I hope I will be able to know how to keep my starter alive (for the next 100 years! I am repeating myself…I know but it seems so funny to keep it for that long) and make delicious bread.

But before I am going to "show" you how my 1st sourdough bread looked like. Please read "My 1st sourdough bread w/pumpkin and chia seeds" . 

Thank you for taking time to read this long post.

Friday, July 15, 2011

Wholemeal Bread with Oatmeal


I love bread. Sometimes I miss freshly-baked bread. Have you ever passed in front of a bakery very early in the morning?  Oh, what a lovely smell! Actually I prefer bread rather than cakes. Really! (if the bread is good, bien sûr!) I definitely acquired a taste for bread when I was small.

In France, bread is not only an accompaniment to meals and served at breakfast with croissants and jam but also (was?) a good treat as kids’ afternoon snack /le goûter. My Mum used to give my siblings and I a slice of bread with a chocolate or crystallized fruit bar to eat during school breaks. I bet most of the kids now have more elaborate snacks?!

Bread is indispensable for people living in the country or doing manual jobs. My grand-father was a postman and would set off very early on his rounds and cycle no less than 40kms per day to deliver the mails to the 3 surrounding villages. At 9am he would take a break and eat some food. I remember seeing him preparing his morning snack /casse-croûte, which consisted of bread and cold smoked pork belly. He was one of these men who would never leave home without his French beret on his head and his pocket-knife on him! However, he never carried a baguette under his arm but in the side pannier of his motorized bike!

As it is difficult to keep baguettes with the humidity in Hong Kong I bake my own bread and I store it in a plastic box in the fridge. It stays fresh for at least one week.  Each morning I enjoy a slice of toast with my cup of coffee.

Here is my recipe:

Wholemeal Bread with Oatmeal
Ingredients:
  • 375 g wholemeal flour
  • 50 g oatmeal
  • 1 tsp baking soda
  • ½ tsp salt
  • 300 ml low-fat milk
Steps:
1.      Preheat oven at gas mark no.6 / 230 ºC.
2.      In a bowl combine the flour, oatmeal, soda and salt.
3.      Make a well in the centre and slowly work in the milk to form a ball.
4.      Place the dough on a floured board and knead it for 5 minutes.
5.      Shape the dough into a flat round loaf and place on a greased baking sheet. Draw a cross with a sharp knife on top of the bread.
6.      Bake 15 minutes at 230 ºC. Reduce the heat to gas no.5 / 200ºC and bake 30 minutes longer or until golden.
7.      Wrap the bread in a cloth towel and leave to cool on a wire rack.


Note: I sometimes put pumpkin seeds and/or Goji berries in and also 1 tbsp of ground flax seeds.


Bon appétit!

Saturday, April 9, 2011

About my menus


The quantity of ingredients used in my recipes is usually for 3-4 persons.

Each dinner-menu consists of 3 courses: 1 soup  + 1 main dish + 1 vegetable

For health reason (my husband's cholesterol level is marginally high) I avoid dairy products and eggs and only use olive oil.
I never use artificial broth. If a recipe needs broth (chicken or beef) and I have no time to make my own, I replace it with water.
I try to use as much as possible fresh vegetables instead of tin/can ones. However, sometimes for practical reasons (to gain time) I would buy pulses (kidney beans, butter beans, garbanzo, etc) in can.

Soups:
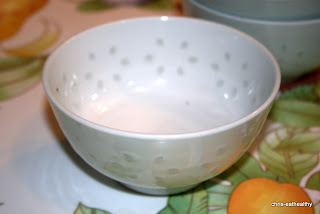
Amount of water required: 6 rice bowls (see photo below) which makes about 4-5 serving bowls.
I recommend scalding meat in boiled water for a few minutes (to remove grease) before preparing the soup.


Rice bowl (250 ml)

Main dishes:
We have a vegeterain main dish at least twice a week and a vegetarian meal once a week.


Vegetables:
I order organic vegetables from Hong Chi Homestead (a Social Enterprise which is run by Hong Chi Association) and I also buy from wet markets and supermarkets. I prefer to buy seasonal vegetables rather than those which are not in season. Our vegetables are either parboiled and pan-fried or stir-fried (in a wok - Chinese style) with ginger and garlic.


Steamed-Rice:
I alternate brown rice and white rice. I add 1 whole clove of garlic in the rice cooker to give flavour.


Fruit / Desserts: It is said and I believe it that fruit are best eaten between meals (or at least 1 hour before).   We usually don't have cakes/dessert in the evening (unless special occasion).


Bread:
I make my own bread. Clik here for recipe.